Layouts · Planning guide

How to plan a kitchen layout

A workable layout comes from a short sequence of decisions, in order: the room, the appliances, the storage, then the finishes. This guide walks through that sequence on an editable example.

Design this kitchen Editable example · no account needed to start

Room first. Finishes last.

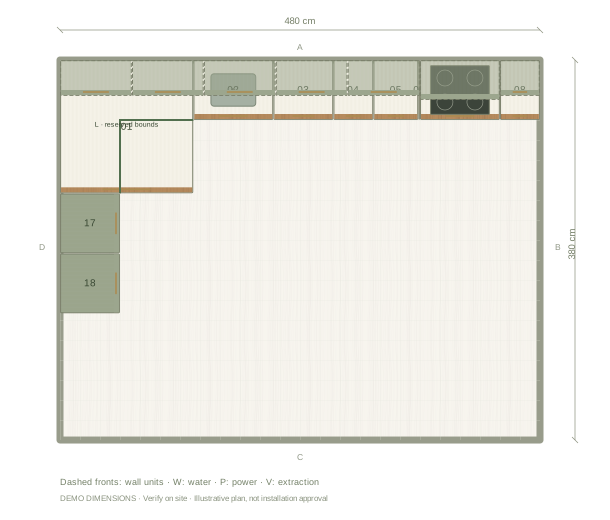
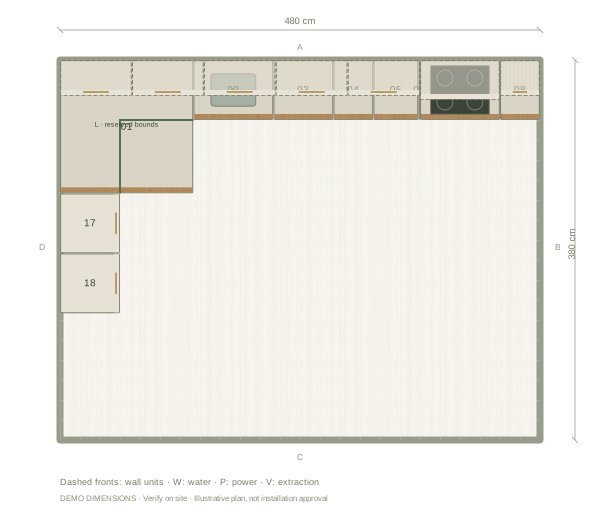
480 × 380 cm room
260 cm ceiling · 18 components

How to plan a kitchen layout example, 480 by 380 centimetres, with labelled component positions
Illustrative plan in cm. Example dimensions; no doors, windows or site services have been assumed. Add your actual openings and fixtures in the editor.
01

Start with the room you actually have

Measure both walls and the ceiling height, and mark doors, windows, radiators and service points before placing a single cabinet. The example uses a 480 × 380 cm room, but its value is the order of decisions, not its dimensions. Enter your own measurements first; a layout that only works at someone else’s size will not survive contact with your walls.

02

Place appliances before storage

Decide where the fridge, hob, oven and sink must go, because plumbing, extraction and power are the hardest things to move. Keep a landing space beside the hob and fridge, and check that appliance doors can open without blocking a drawer or a walkway. Only then fill the remaining width with the storage you reach for most.

03

Check the layout in three views

A plan shows widths; an elevation shows whether wall cabinets clear heads and worktops; the 3D view shows how the room feels from the door. Move between all three before settling. If two runs face each other, check the gap with doors and drawers open, not just the body-to-body distance on the plan.

Questions before you start

Which layout should I choose first?

Start from your longest uninterrupted wall. One run suits narrow rooms, an L opens the centre, and a U or island needs enough width that facing units still leave a comfortable walking gap.

When do I choose colours and handles?

After the layout survives the checks. Finishes change in one click, but moving a sink or a tall unit late in the process usually means starting the arrangement again.
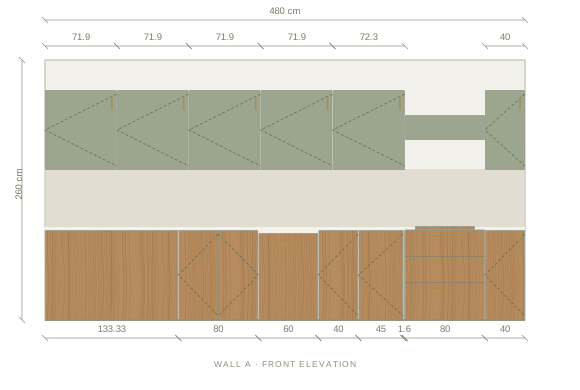
The front elevation

Review the main wall’s cabinet heights, appliance spaces and finish balance. Other walls are available in the editor.

Main wall elevation of the planning a kitchen layout example
Illustrative main-wall elevation. Digital materials are not supplier samples.

Example cabinet & appliance list

Planning dimensions in centimetres. These generic components are editable and do not identify purchasable supplier products.

Width × depth × height; cabinet heights exclude the visual worktop.
Ref.ComponentWidthDepthHeight
01L-shaped corner cabinet133.3 cm133.3 cm90 cm
02Sink cabinet80 cm60 cm90 cm
03Dishwasher60 cm60 cm87 cm
04Base cabinet40 cm60 cm90 cm
05Base cabinet45 cm60 cm90 cm
06Filler strip1.6 cm60 cm90 cm
07Drawer cabinet80 cm60 cm90 cm
08Base cabinet40 cm60 cm90 cm
09Induction hob60 cm50 cm4 cm
10Extractor hood80 cm40 cm25 cm
11Wall cabinet71.9 cm36 cm80 cm
12Wall cabinet71.9 cm36 cm80 cm
13Wall cabinet71.9 cm36 cm80 cm
14Wall cabinet71.9 cm36 cm80 cm
15Wall cabinet72.3 cm36 cm80 cm
16Wall cabinet40 cm36 cm80 cm
17Oven + microwave tower60 cm60 cm230 cm
18Integrated fridge60 cm60 cm230 cm

Before installation: verify measurements on site, resolve cabinet junctions and worktop details, and enter the chosen appliances’ installation and ventilation requirements.